General Deployment
Operations and SRE teams can use hashistack to safely manage ELK deployment using infrastructure as code methodology, which allows us to peer-reviewed infrastructure changes in an automated and controlled fashion.
The ELK stack is an acronym used to describe a stack that comprises three popular projects: Elasticsearch, Logstash, and Kibana. Often referred to as Elasticsearch, the ELK stack gives us the ability to aggregate logs from all our systems and applications, analyze these logs, and create visualizations for application and infrastructure monitoring, faster troubleshooting, security analytics, and more.
Assuming ELK is a non-frequently deployed tech asset, hashistack makes it a semi-automated deployment.
hashistack deploys ELK as a t2.large instance. This is because all Elasticsearch, Kibana, and Logstash are contained in it, which can cause performance issue in small instance. t2.large, by experiment, is the smallest size that supports smooth runtime. For that, please be aware AWS credit charges shall incur afterward
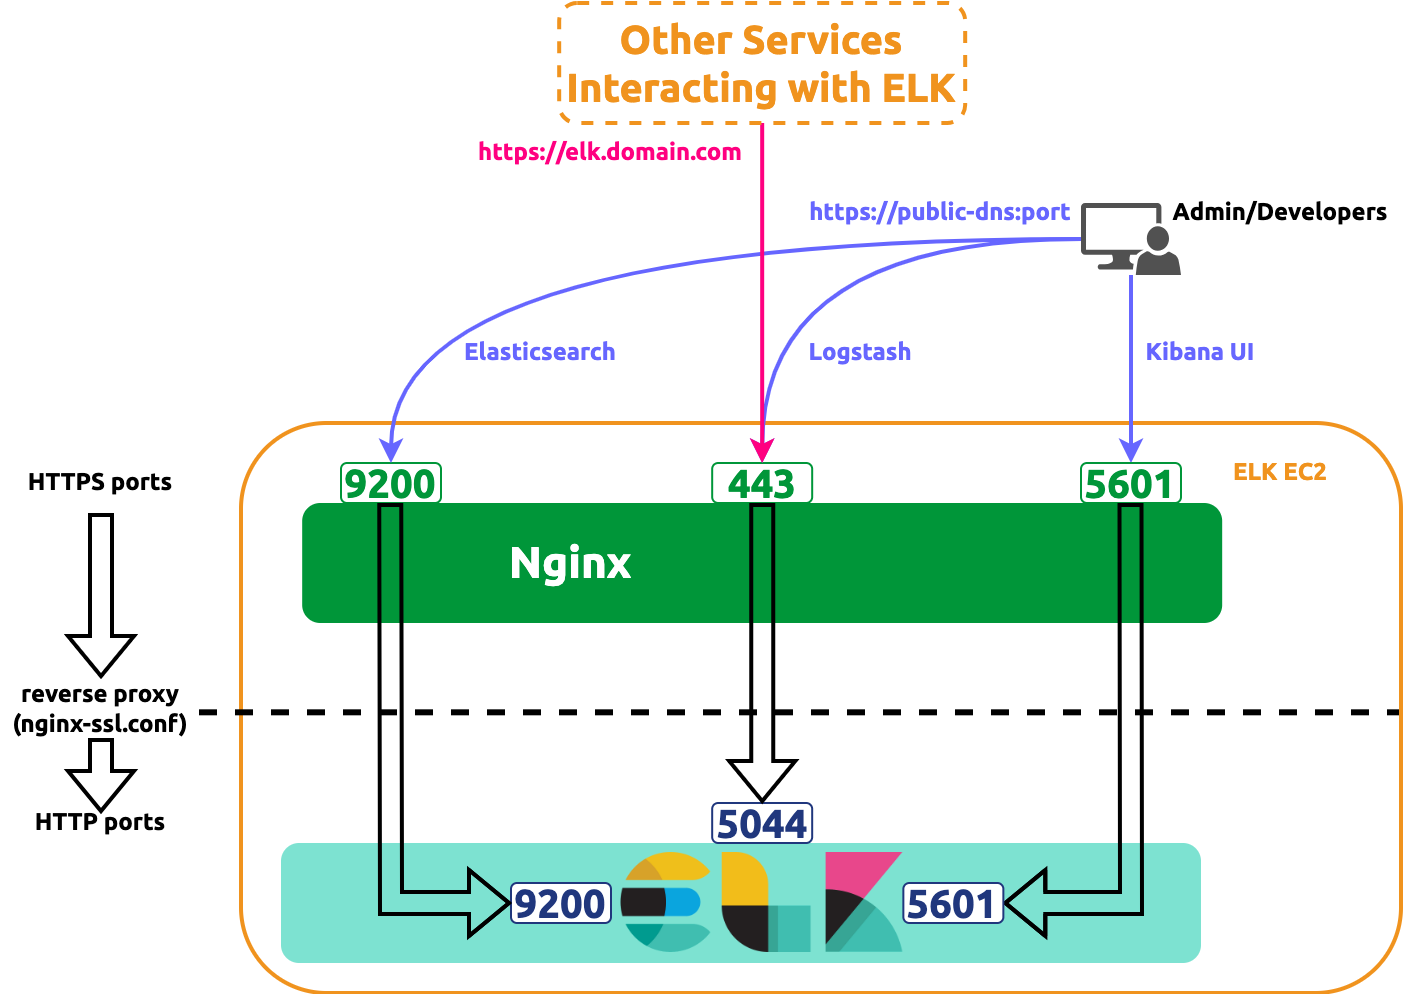
hashistack deploys ELK in the following way:
- Deploys all components of ELK in HTTP mode
- Deploys a reverse proxy Nginx in front of the ELK in the same EC2 to redirect all HTTPS request to ELK's corresponding HTTP ports
The diagram below illustrates the resulting deployment
General Deployments
Please complete the general setup before proceeding.
We offer a Nginx config file template. This template will be used by hashistack by default
Defining Packer Variables
Create a HashiCorp Packer variable values file named aws-elk.pkrvars.hcl under hashistack/hashicorp/elk/images with the following contents:
ami_region             = "us-east-2"
ami_name               = "my-elk-ami"
ssl_cert_file_path     = "/path/to/ssl.crt"
ssl_cert_key_file_path = "/path/to/ssl.key"
ami_regionis the region where ELK AMI will be published to. The published image will be privateami_nameis the published AMI name; it can be arbitraryssl_cert_file_pathis the absolute path or the path relative to hashistack/hashicorp/elk/images of the SSL certificate file for the domain serving the ELK EC2 instancessl_cert_key_file_pathis the absolute path or the path relative to hashistack/hashicorp/elk/images of the SSL certificate key file for the domain serving the ELK EC2 instance
Defining Terraform Variables
Create a HashiCorp Terraform variable values file named aws-elk.tfvars under **hashistack/hashicorp/elk/instances**with the following contents:
aws_ec2_region = "us-east-2"
ami_name          = "my-elk-ami"
instance_name     = "My ELK instance"
key_pair_name     = "My AWS keypair name"
security_groups   = ["My ELK Security Group"]
elk_domain         = "myelk.mycompany.com"
route_53_zone_id  = "9DQXLTNSN7ZX9P8V2KZII"
-
aws_ec2_regionis the EC2 runtime region where ELK EC2 instance will be deployed into -
ami_nameis the name of the published AMI; it must be the same as theami_namein Packer variable file -
instance_nameis the deployed EC2 name as appeared in the instance list of AWS console; it can be arbitrary -
key_pair_nameis the name of AWS EC2 key pair bound to this ELK instance. We will use this key pair to later ssh into the ELK to for post setup discussed below -
security_groupsis the list of AWS Security Group names to associate with (yes, not ID, but name...) -
elk_domainis the SSL-enabled domain that will serve various ELK endpoints, such as its API and Kibana UIwarninghashistack will bind a private IP address to this domain for the following reasons:
- AWS security groups works for private IP only for DNS resolving. Services sending logs to ELK can use this domain.
- In the case of internal access, for example developers visiting Kibana UI for debugging purposes, people can still
use
https://public-dns:port
-
route_53_zone_idis the AWS Route 53 hosted Zone ID that hosts the domain "myelk.mycompany.com"tipTo find the zone ID in AWS Route 53, we can:
- Sign in to the AWS Management Console
- Open the Route 53 console at https://console.aws.amazon.com/route53/
- Select Hosted zones in the navigation pane
- Find the requested ID in the top level Hosted Zones summary in the Route 53 section
Building AMI Image
cd hashistack/hashicorp/elk/images
packer init .
packer validate -var "skip_create_ami=true" .
packer build -var "skip_create_ami=false" .
Record the Elasticsearch password (for elastic user) at command line prompt. For example
==> install-elk.amazon-ebs.elk: + sudo /usr/share/elasticsearch/bin/elasticsearch-reset-password -u elastic
==> install-elk.amazon-ebs.elk: + yes
    install-elk.amazon-ebs.elk: This tool will reset the password of the [elastic] user to an autogenerated value.
    install-elk.amazon-ebs.elk: The password will be printed in the console.
    install-elk.amazon-ebs.elk:
    install-elk.amazon-ebs.elk:
    install-elk.amazon-ebs.elk: Password for the [elastic] user successfully reset.
    install-elk.amazon-ebs.elk: New value: dsrg34IKHU787iud=dio
In this case, the password is dsrg34IKHU787iud=dio which is shown in the last line of the output above. We will be using this password in later steps so please keep it securely
Deploying to EC2
cd ../instances/
terraform init
terraform validate
terraform apply -auto-approve
Post Setup in EC2 Instance
As we've mentioned in the beginning, this is a semi-deployment and we still need to SSH into the box to manually generate Kibana token & verification code. This will make the automated deployment logic simple and easy to maintain
sudo /usr/share/elasticsearch/bin/elasticsearch-create-enrollment-token --scope kibana --url "https://localhost:9200"
sudo /usr/share/kibana/bin/kibana-verification-code
Now we can visit https://public-dns:port to enter the token and verification code to access our ELK instance.
Logstash
Logstash, at this moment, supports redirecting log lines from Filebeat to Elasticsearch and, similar to the token and verification above, needs to be setup manually.
Create a file named logstash-filebeat.conf in the default location chosen by Logstash:
sudo nano /usr/share/logstash/logstash-filebeat.conf
Copy and paste the following contents into the file
Replace the <password for user 'elastic'> accordingly. If the user is elastic, which is the case here, the password
has been generated during the AMI image building phase
input {
    beats {
        port => "5044"
    }
}

output {
    elasticsearch {
        hosts => [ "https://localhost:9200" ]

        ssl_certificate_verification => false

        user => "elastic"

        password => "<password for user 'elastic'>"
    }
}
Start Logstash with:
sudo /usr/share/logstash/bin/logstash -f logstash-filebeat.conf --config.reload.automatic
or with nohup at background:
nohup sudo /usr/share/logstash/bin/logstash -f logstash-filebeat.conf --config.reload.automatic &
Deployment via Screwdriver CD
hashistack also support deployment using Screwdriver CD
Deployment via GitHub Actions
Deployment via HACP
Please try our HACP platform to deploy an ELK instance. It gives us one-click experience that helps us stand up ELK in a minute.