
· 2 min read

How do we know if we can run terraform apply to our infrastructure without negatively affecting critical business applications? We can run terraform validate and terraform plan to check our configuration, but will that be enough? Whether we've updated some HashiCorp Terraform configuration or a new version of a module, we want to catch errors quickly before we apply any changes to production infrastructure.

In this post, We will discuss some testing strategies for HashiCorp Terraform configuration and modules so that we can terraform apply with greater confidence.

The Testing Pyramid

In theory, we might decide to align our infrastructure testing strategy with the test pyramid, which groups tests by type, scope, and granularity. The testing pyramid suggests that we write fewer tests in the categories at the top of the pyramid, and more at the bottom. Those on the pyramid take more time to run and cost more due to the higher number of resources we have to configure and create.

Error loading pyramid.png

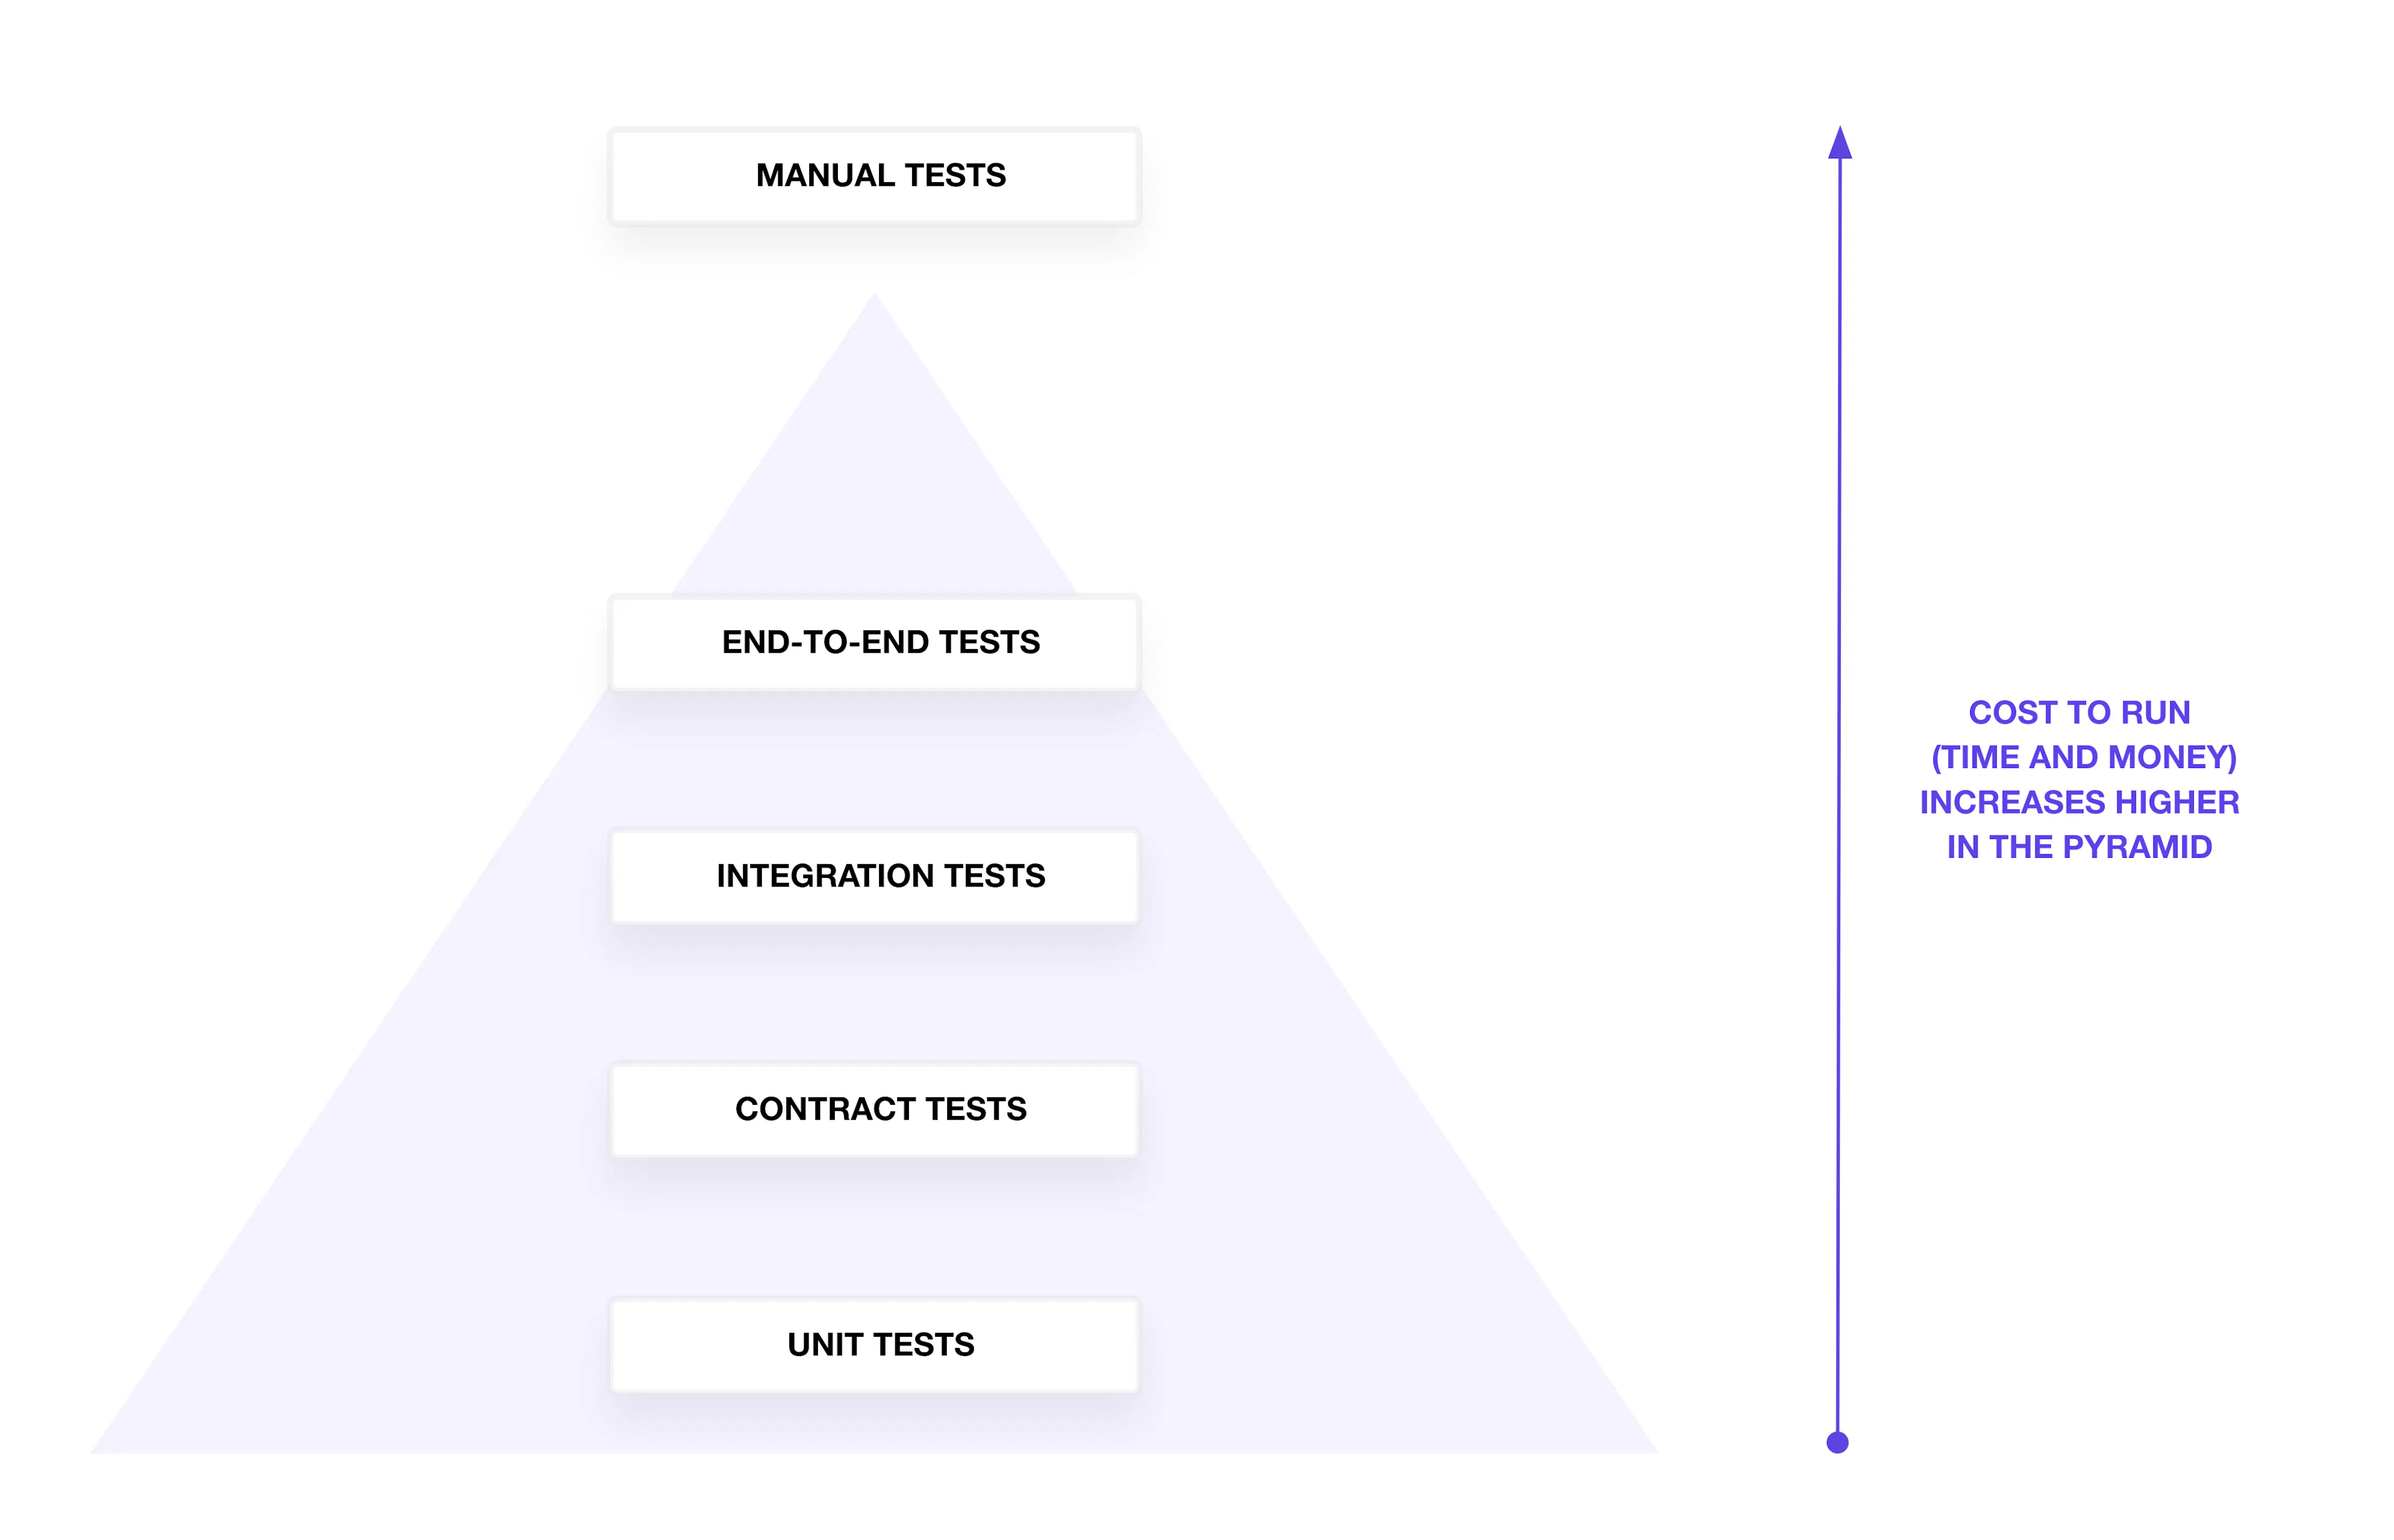
In reality, our tests may not perfectly align with the pyramid shape. The pyramid offers a common framework to describe what scope a test can cover to verify configuration and infrastructure resources. We'll start at the bottom of the pyramid with unit tests and work the way up the pyramid to end-to-end tests.

note

hashicorp-aws does not merit any manual testing; so it is not discussed here

Linting and Formatting

While not on the test pyramid, we often encounter tests to verify the hygiene of your Terraform configuration. Use terraform fmt -check and terraform validate to format and validate the correctness of our Terraform configuration.

When we collaborate on Terraform, we may consider testing the Terraform configuration for a set of standards and best practices. Build or use a linting tool to analyze our Terraform configuration for specific best practices and patterns. For example, a linter can verify that our teammate defines a Terraform variable for an instance type instead of hard-coding the value.

Unit Tests

At the bottom of the pyramid, unit tests verify individual resources and configurations for expected values. They should answer the question, “Does my configuration or plan contain the correct metadata?” Traditionally, unit tests should run independently, without external resources or API calls.

· 2 min read
Jiaqi Liu
info

This action assumes the yarn package manager is used.

Cypress E2E action offers an easy way to automate, customize, and execute parallel end-to-end tests. The action provides

  • dependency installation via yarn,
  • scanning of test specs,
  • running each spec in parallel, and
  • upload test screenshots and video on test failure.

The example below is a very simple setup:

  1. Install Cypress with yarn add cypress --dev

  2. Initialize Cypress with yarn run cypress open

  3. Support TypeScript

  4. Put all .spec.cy.ts test files under "cypress/e2e" directory

  5. Install wait-on: yarn add -D wait-on

  6. Add the following script command to package.json:

    {
    ...

    "scripts": {
    "e2e": "cypress run --browser chrome",
    "wait-on-dev": "wait-on http-get://localhost:3000/",
    "wait-on-prod": "wait-on http-get://localhost:3000/"
    },

    ...
    }
    info

    Note that we assume the UI is running at port 3000. Please adjust it accordingly if it's running at a different port.

  7. Use Cypress E2E Tests workflow:

    ---
    name: CI/CD

    "on":
    pull_request:
    push:
    branches:
    - master

    e2e-tests:
    name: Unit Tests
    needs: unit-tests
    uses: QubitPi/hashicorp-aws/.github/workflows/cypress-e2e.yml@master

    In the example above, the node 18 is used in the CI/CDed project by default. A list of custom node versions can be used to replace the default. For example, to run E2E tests in node 16, 18, and 20, simply use node-versions parameter:

    ---
    e2e-tests:
    name: Unit Tests
    needs: unit-tests
    uses: QubitPi/hashicorp-aws/.github/workflows/cypress-e2e.yml@master
    with:
    node-versions: '["16", "18", "20"]'
tip

Inside the cypress-e2e workflow, each [Cypress spec] is tested in 2 modes:

  1. yarn-start: the web app is started using yarn start
  2. server: a production build is generated first using yarn build and then the web app is started with yarn serve

The reason we run the same E2E in 2 separate modes is that we assume E2E testing consists of 2 logical parts:

  1. The logical tests defined by Cypress spec files
  2. The same tests in the context of integration of web app logic and the production runtime github-actions-core

The app may work perfectly fine in E2E, but it's a different question when the same app is packaged up using, for example, webpack. The later could also be interpreted as integration tests against webpack configuration which makes the tests more comprehensive

· One min read
Jiaqi Liu

Installing JDK 17

The standard actions/setup-java requires us to specify JDK distributions other than JDK version. Looking up JDK distributions wastes user's time and gives opportunities to error.

We offer a no-config action that installs JDK 17 by default. The usage is as follows:

name: CI/CD

"on":
pull_request:
push:
branches:
- master

jobs:
tests:
runs-on: ubuntu-latest
steps:
- name: Set up JDK
uses: QubitPi/hashicorp-aws/.github/actions/jdk-setup@master

· One min read
Jiaqi Liu
tip

This action works for both npm and yarn package managers

The NPM release action bundles up a React/Vue package and publishes it to npm registry.

To use the release action, create a GitHub Secret for npm token, which will be used to authenticate against NPM in the action. Then use the following template in CI/CD:

name: CI/CD

"on":
pull_request:
push:
branches:
- master

env:
NODE_VERSION: 18

jobs:
publish:
name: Publish Package to NPM
if: github.ref == 'refs/heads/master'
runs-on: ubuntu-latest
steps:
- uses: QubitPi/hashicorp-aws/.github/actions/npm-release.yml@master
with:
node-version: ${{ env.NODE_VERSION }}
npm-token: ${{ env.NPM_TOKEN }}
user: Qubitpi
email: jack20220723@gmail.com

· One min read
Jiaqi Liu

The UI unit test action runs unit tests and assumes the yarn package manager and requires a test script to be defined in projects package.json file. For example, the following uses Jest as the unit test runner:

{
"scripts": {
"test": "jest"
}
}

To use this action, import it in the following way:

name: CI/CD

"on":
pull_request:
push:
branches:
- master

unit-tests:
name: Unit Tests
uses: QubitPi/hashicorp-aws/.github/workflows/ui-unit-test.yml@master
with:
node-version: 18
tip

In the example above, the node 18 is used in the CI/CDed project.

tip

The example above uses Node version 18, which is specified in NODE_VERSION environment variable

· 2 min read
Jiaqi Liu

In Frontend dev realm, there are lots of code style checker. Assembling all of them together takes efforts and pains. This action runs the following two code style checker specifically for frontend dev:

  1. Prettier
  2. ESLint

This action assume ESLint, typescript-eslint, and Prettier have been installed, which can be done with:

yarn add --dev @typescript-eslint/parser @typescript-eslint/eslint-plugin eslint typescript
yarn add --dev --exact prettier

Here is an example usage of the action:

name: CI/CD

"on":
pull_request:
push:
branches:
- master

code-style:
name: React & TS Code Style Check
uses: QubitPi/hashicorp-aws/.github/workflows/ui-code-style.yml@master
with:
node-version: 18
tip

In the example above, the node 18 is used in the CI/CDed project.

The configurations of Prettier and ESLint can be done regularly by following their respective documentations. For example, the .prettierrc.json and .prettierignore can be placed at the project root with the following contents:

.prettierrc.json
{
"tabWidth": 2,
"useTabs": false,
"printWidth": 120
}
.prettierignore
*.md
*.mdx
build
coverage
node_modules
tip

We can fix it by formatting all files at the root of project with:

yarn prettier . --write

Initial ESLint configuration template can be generated with

yarn run eslint --init # https://dev.to/maithanhdanh/configuration-for-eslint-b47
Prettier & ESLint Conflict

Linters usually contain not only code quality rules, but also stylistic rules. Most stylistic rules are unnecessary when using Prettier, but worse - they might conflict with Prettier! Use Prettier for code formatting concerns, and linters for code-quality concerns, as outlined in Prettier vs. Linters.

Luckily it's easy to turn off rules that conflict or are unnecessary with Prettier, by using these pre-made configs:

yarn add --dev eslint-config-prettier

· 3 min read
Jiaqi Liu

Inspired by Sous Chefs, hashicorp-aws offers a reusable workflow that performs the following code style checks:

  1. YAML file style check
  2. Markdown file style check
  3. Broken link check

Example Usage:

name: CI/CD

"on":
pull_request:
push:
branches:
- master

jobs:
yml-md-style-and-link-checks:
uses: QubitPi/hashicorp-aws/.github/workflows/yml-md-style-and-link-checks.yml@master
tip

The example above is all we need to run the 3 checks. The workflow has default configurations, which can be overridden

The configurations of the composing checks can be configured regularly by following their respective GitHub Actions documentations. The following sections discusses the configuration by example.

(Optional) Overriding Default Configurations

YAML File Style Check

The default YAML style configurations is

---
extends: default
rules:
line-length:
max: 256
level: warning
document-start: disable
braces:
forbid: false
min-spaces-inside: 0
max-spaces-inside: 1
min-spaces-inside-empty: -1
max-spaces-inside-empty: -1

To override the default configuration, create a file named .yamllint at the root of the downstream project and configure the workflow with use-custom-yamllint-config-file option set to true. For example

name: CI/CD

"on":
pull_request:
push:
branches:
- master

jobs:
yml-md-style-and-link-checks:
uses: QubitPi/hashicorp-aws/.github/workflows/yml-md-style-and-link-checks.yml@master
with:
use-custom-yamllint-config-file: true
tip

More configuration options can be found at yamllint documentation

Markdown File Style Check

The configurations of markdown file style check are splitted into 2 config files whose default configurations are

rules "~MD002", "~MD003", "~MD005", "~MD007", "~MD013", "~MD022", "~MD024", "~MD029", "~MD033", "~MD034", "~MD036", "~MD041"
style "#{File.dirname(__FILE__)}/markdownlint.rb"
tip

In the example above, the first line above excludes specified rules. The second line specifies the rule configuration file (markdownlint.rb). For more native config options, please refer to its documentations

Create files named .mdlrc and markdownlint.rb at the root of the project and add use-custom-mdlrc-config-file and use-custom-markdownlint-config-file options to the workflow file like so:

name: CI/CD

"on":
pull_request:
push:
branches:
- master

jobs:
yml-md-style-and-link-checks:
uses: QubitPi/hashicorp-aws/.github/workflows/yml-md-style-and-link-checks.yml@master
with:
use-custom-mdlrc-config-file: true
use-custom-markdownlint-config-file: true

The Broken link check pretty much configures everything for us, so we don't need to configure anything unless we need to exclude links or file by regular expression. hashicorp-aws defaults to exclude all relative file links with the following default:

.lycheeignore
file:///*
info

The ignore rule in the example above skips checks of all relative links among files. This is common in Docusaurus-based documentation

If we don't need such default, we would simply create a .lycheeignore file at our project root and setting use-custom-lycheeignore-file to true:

name: CI/CD

"on":
pull_request:
push:
branches:
- master

jobs:
yml-md-style-and-link-checks:
uses: QubitPi/hashicorp-aws/.github/workflows/yml-md-style-and-link-checks.yml@master
with:
use-custom-lycheeignore-file: true

· 2 min read
Jiaqi Liu

Overview

Being a strong proponent of Immutable Infrastructure, hashicorp-aws is constantly pushing the limits of its ability in various use cases, one of which is the Configuration Management

Traditional configuration management includes Chef, Puppet, and Ansible. They all assume mutable infrastructure being present. For example, Chef has a major component responsible for jumping into a VM, checking if config has been mutated before apply any operations.

With the adoption of Immutable infrastructure, we initially stored and managed our configuration, such as SSL certificate or AWS SECRET ACCESS KEY directly in GitHub Secrets. This has the disadvantage of not being able to see their values after creation, making it very hard to manage.

Then we moved to a centralized runbook, where everything can easily be seen and modified by authorized team members. In this approache, CI/CD server will pull down the entire runbook and simply pick up the config files. This, however, exposed a great security risk because illegal usage could simply leak any credentials to public by cating that credential file out

So the problem, or what hashicorp-aws is trying to solve here, is

  • being able to keep credentials, whether it's string values or values stored in files, secure, and
  • allowing team member to easily manage those credentials
note

We tried HashiCorp Vault but it doesn't support storing file credential, hashicorp-aws addressed exactly how file can be managed in this case

So this brought us to the alternative way of thinking about Configuration Management in Immutable Infrastructure, which is depicted below:

We still need GitHub Secrets because our tech dev has a deep integratin with it and that's the most secure way to pass our organization credentials around.

In addition, we will also keep runbook for config management. The runbook will be hosted separately, not in GitHub Secrets.

info

Runbooks was used in Yahoo that keeps all DevOps credentials in a dedicated GitHub private repo. It's been proven to be an effective way to manage and share a software configurations within a team.

hashicorp-aws's github-secret now comes into play to bridge the gap between two componet.