
The proliferation of different repository formats and tools accessing them as well as the emergence of more publicly available repositories has triggered the need to manage access and usage of these repositories and the components they contain.
Hosting our private repositories for internal components has proven to be a very efficient methodology to exchange components during all phases of the software development lifecycle. It is considered a best practice at this stage.
The task of managing all the repositories a development teams interact with can be supported by the use of a dedicated server application - a repository manager. To put it simply, a repository manager provides two core features:
- the ability of proxying a remote repository and cache components saving both bandwidth and time required to retrieve a software component from a remote repository repeatedly
- the ability of hosting a repository providing an organization with a deployment target for internal software components
Just as Source Code Management (SCM) tools are designed to manage source code, repository managers have been designed to manage and trace external dependencies and components generated by internal build.
Repository managers are an essential part of any enterprise or open-source software development effort and they enable greater collaboration between developers and wider distribution of software by facilitating the exchange and usage of binary components.
When we install a repository manager, we are bringing the power of a repository like the Central Repository into our organization. We can use it to proxy the Central Repositories and other repositories, and host our own repositories for internal and external use.
In addition to the two aforementioned core features, a repository manager can support the following use cases
- allows us to manage binary software components through the software development lifecycle
- search and catalogue software components
- control component releases with rules and add automated notifications
- integrate with external security systems, such as LDAP
- manage component metadata
- control access to components and repositories
- display component dependencies
- brose component archive contents
Using a repository manager provides a number of benefits, including
- improved software build performance due to faster component download off the local repository manager
- reduced bandwidth usage due to component caching
- higher predictability and scalability due to limited dependency on external repositories
- increased understanding of component usage due to centralized storage of all used components
- simplified developer configuration due to central access configuration to remote repositories and components on the repository manager
- unified method to provide components to consumer reducing complexity overheads
- improved collaboration due to the simplified exchange of binary components
System Requirements
Memory Requirements
The requirements assume there are no other significant memory hungry processes running on the same host.
| **** | JVM Heap | JVM Direct | Host Physical/RAM |
|---|---|---|---|
| **Minimum ( default ) ** | 2703MB | 2703MB | 8GB |
| Maximum | 4GB | (host physical/RAM * 2/3) - JVM max heap | no limit |
Disk Space
Application Directory - The size of this directory varies slightly each release. It currently around 330 MB. It is normal to have multiple application directories installed on the same host over time as repository manager is upgraded.
Data Directory - On first start, repository manager creates the base files needed to operate. The bulk of disk space will be held by our deployed and proxied artifacts, as well as any search indexes. This is highly installation specific, and will be dependent on the repository formats used, the number of artifacts stored, the size of our teams and projects, etc. It's best to plan for a lot though, formats like Docker and Maven can use very large amounts of storage (500Gb easily). When available disk space drops below 4GB the database will switch to read-only mode.
Concepts
The Nexus Repository Manager OSS is all about working with components and repositories.
Components
A component is a resource like a library or a framework that is used as part of a software application at run-time, integration or unit test execution time or required as part of build process. It could be an entire application or a static resource like an image.
Typically these components are archives of a large variety of files, such as Java bytecode in class files, text files, or binary files such as images, PDFs, and music files. The archives have numerous formats such as JAR, WAR, ZIP, NPM packages, or .sh
Components can be composed of multiple, nested components themselves. For example, consider a Java web application packaged as a WAR component. It contains a number of JAR components and a number of JavaScript libraries. All of these are standalone components in other contexts and happend to be included as part of the WAR component.
Components provide all the building blocks and features that allow a development team to create powerful applications by assembling them and adding their own business related components to create a full-fledged, powerful application.
Components, in other tool-chains, are called artifacts, packages, bundles, archives, and other terms. The concept and idea, however, remain the same and component is used as the independent, generic term.
Repository
A wide variety of components exists and more are continuously created by the open source community as well as proprietary vendors. These are libraries and frameworks written in various languages on different platforms that are used for application development every day. It has become a default pattern to build applications by combining the features of multiple components with our own custom components containing our application code to create an application for a specific domain
In order to ease the consumption and usage of components, they are aggregated into collection of components. These are called repositories and are typically available on the internet as a service. On different platforms terms such as registry and others are used for the same concept.
Examples for such repositories are
- the Central Repository, also known as Maven Central
- the NuGet Gallery
- RubyGems.org
- npmjs.org
Components in these repositories are accessed by numerous tools including
- package managers like npm, nuget or gem
- build tools such as Maven, Gradle, rake or grunt
- IDE's such as Eclipse and IntelliJ
Repository Format
The different repositories use different technologies to store and expose the components in them to client tools. This defines a repository format and as such is closely related to the tools interacting with the repository.
For example, the Maven repository format relies on a specific directory structure defined by the identifiers of the components and a number of XML formatted files for metadata. Component interaction is performed via plain HTTP commands and some additional custom interaction with the XML files.
Other repositories formats use database for storage and REST API interactions, or different directory structures wit format specific files for the metadata
Repository Management
We've seen that repositories are the containers for the components provided to our users. Creating and managing repositories is an essential part of our Nexus Repository configuration, since it allows us to expose more components to our users. It supports proxy repositories, hosted repositories and repository groups in a number of different repository formats.
To manage repositories select the Repositories item in the Repository sub menu of the Administration menu.
The binary parts of a repository are stored in blob stores, which can be configured by selecting Blob Stores from the Repository sub menu of the Administration menu.
Repository Types
Proxy Repository
A repository with the type proxy, also known as a proxy repository, is a repository that is linked to a remote repository. Any request for a component is verified against the local content of the proxy repository. If no local component is found, the request is forwarded to the remote repository. The component is then retrieved and stored locally in the repository manager, which acts as a cache. Subsequent requests for the same component are then fulfilled from the local storage, therefore eliminating the network bandwidth and time overhead of retrieving the component from the remote repository again.
By default, the repository manager ships with the following configured proxy repositories:
- maven-central This proxy repository accesses the Central Repository, formerly known as Maven Central. It is the default component repository built into Apache Maven
- nuget.org-proxy This proxy repository accesses the NuGet Gallery. It is the default
component repository used by the
nugetpackage management tool used for .Net development.
Hosted Repository
A repository with the type hosted, also known as a hosted repository, is a repository that stores components in the repository manager as the authoritative location for these components.
By default, the repository manager ships with the following configured hosted repositories:
- maven-releases This hosted repository uses the maven2 repository format with a release version policy. It is intended to be the repository where an organization publishes internal releases. We can also use this repository for third-party components that are not available in external repositories and can therefore not be retrieved via a configured proxy repository. Examples of these components could be commercial, proprietary libraries such as an Oracle JDBC driver that may be referenced by the organization.
- maven-snapshots This hosted repository uses the maven2 repository format with a snapshot version policy. It is intended to be the repository where the organization publishes internal development versions, also known as snapshots.
- nuget-hosted This hosted repository is where the organization can publish internal releases in repository using the nuget repository format. We can also use this repository for third-party components that are not available in external repositories, that could potentially be proxied to gain access to the components.
Repository Group
A repository with the type group, also known as repository group, represents a powerful feature of Nexus Repository Manager. They allow us to combine multiple repositories and other repository groups in a single repository. This in turn means that our users can rely on a single URL for their configuration needs, while the administrators can add more repositories and therefore components to the repository group.
When a user is given a privilege to a group repository, then that user will also have that privilege to all transitive members of that group repository only when their request is directed to the group repository. Direct requests to individual member repositories will only work if the user is given explicit permission to the individual repository.
The repository manager ships with the following groups:
- maven-public The maven-public group is a repository group of maven2 formatted repositories and combines the important external proxy repository for the Central Repository with the hosted repositories maven-releases and maven-snapshots. This allows us to expose the components of the Central Repository as well as our internal components in one single, simple-to-use repository and therefore URL.
- nuget-group This group combines the nuget formatted repositories nuget-hosted and nuget.org-proxy into a single repository for .Net development with NuGet.
Managing Repositories and Repository Groups
TBA
Setting Up Maven Repositories
Historically Nexus Repository Manager started as a repository manager supporting the Maven repository format and it continues to include excellent support for users of Apache Maven.
Maven Repository Format Overview
Looking at the Maven repository format and associated concepts and ideas allows us to grasp some of the details and intricacies involved with different tools and repository formats, that will help us appreciate the need for repository management.
Maven developers are familiar with the concept of a repository, since repositories are used by default. The primary type of a binary component in a Maven format repository is a JAR file containing Java byte-code. This is due to the Java background of Maven and the fact that the default component type is a JAR. Practically however, there is no limit to what type of component can be stored in a Maven repository. For example, we can easily deploy WAR or EAR files, source archives, Flash libraries and applications, Android archives or applications or Ruby libraries to a Maven repository.
Every software component is described by an XML document called a Project Object Model (POM). This POM contains information that describes a project and lists a project’s dependencies - the binary software components, which a given component depends upon for successful compilation or execution.
When Maven downloads a component like a dependency or a plugin from a repository, it also downloads that component's POM. Given a component's POM, Maven can then download any other components that are required by that component.
Maven, which interacts with a Maven repository to search for binary software components, model the projects they manage and retrieve software components on-demand from a repository.
The Central Repository
When we download and install Maven without any customization, it retrieves components from the Central Repository. It serves millions of Maven users every single day. It is the default, built-in repository using the Maven repository format and is managed by Sonatype. We can also view statistics about the size of the Central Repository online.
The Central Repository is the largest repository for Java-based components. It can be easily used from other build tools as well. One can look at the Central Repository as an example of how Maven repositories operate and how they are assembled. Here are some of the properties of release repositories such as the Central Repository:
- Component Metadata All software components added to the Central Repository require proper metadata, including a Project Object Model (POM) for each component that describes the component itself and any dependencies that software component might have.
- Release Stability Once published to the Central Repository, a component and the metadata describing that component never change. This property of a release repository, like the Central Repository, guarantees that projects that depend on releases will be repeatable and stable over time. While new software components are being published every day, once a component is assigned a release number on the Central Repository, there is a strict policy against modifying the contents of a software component after a release.
- Component Security The Central Repository contains cryptographic hashes and PGP signatures that can be used to verify the authenticity and integrity of software components served and supports connections in a secure manner via HTTPS.
- Performance The Central Repository is exposed to the users globally via a high performance content delivery network of servers.
In addition to the Central Repository, there are a number of major organizations, such as Red Hat, Oracle or the Apache Software foundation, which maintain separate additional repositories. Best practice to facilitate these available repositories with Nexus Repository Manager OSS is to proxy and cache the contents on our own network.
Component Coordinates and the Repository Format
Component coordinates create a unique identifier for a component. Maven coordinates use the following values: groupId, artifactId, version, and packaging. This set of coordinates is often referred to as a GAV coordinate, which is short for Group, Artifact, Version coordinate. The GAV coordinate standard is the foundation for Maven's ability to manage dependencies. Four elements of this coordinate system are described below:
- groupId A group identifier groups a set of components into a logical group. Groups are often designed to reflect the organization under which a particular software component is being produced. For example, software components produced by the Maven project at the Apache Software Foundation are available under the groupId "org.apache.maven"
- artifactId An artifactId is an identifier for a software component and should be a descriptive name. The combination of groupId and artifactId must be unique for a specific project.
- version The version of a project ideally follows the established convention of semantic versioning. For example, if our simple-library component has a major release version of 1, a minor release version of 2 and point release version of 3, the version would be 1.2.3. Versions can also have alphanumeric qualifiers which are often used to denote release status. An example of such a qualifier would be a version like "1.2.3-BETA" where BETA signals a stage of testing meaningful to consumers of a software component.
- packaging Maven was initially created to handle JAR files, but a Maven repository is completely agnostic about the type of component it is managing. Packaging can be anything that describes any binary software format including: zip, nar, war, ear, sar and aar.
Tools designed to interact Maven repositories translate component coordinates into a URL which corresponds to a location in a Maven repository. If a tool such as Maven is looking for version "1.2.0" of the "commons-lang" JAR in the group "org.apache.commons", this request is translated into:
<repoURL>/org/apache/commons/commons-lang/1.2.0/commons-lang-1.2.0.jar
Maven also downloads the corresponding POM for "commons-lang 1.2.0" from:
<repoURL>/org/apache/commons/commons-lang/1.2.0/commons-lang-1.2.0.pom
This POM may contain references to other components, which are then retrieved from the same repository using the same URL patterns.
Release and Snapshot Repositories
A Maven repository stores two types of components:
- Release repositories are for stable, static release components. A release component is a component which was created by a specific, versioned release. For example, consider the "1.2.0" release of the "commons-lang" library stored in the Central Repository. This release component, "commons-lang-1.2.0.jar", and the associated POM, "commons-lang-1.2.0.pom", are static objects which will never change in the Central Repository. Released components are considered to be solid, stable and perpetual in order to guarantee that builds which depend upon them are repeatable over time. The released JAR component is associated with a PGP signature, an MD5, and a SHA check-sum which can be used to verify both the authenticity and integrity of the binary software component.
- Snapshot repositories are frequently updated repositories that store binary software components from projects under constant development. Snapshot components are components generated during the development of a software project. A Snapshot component has both a version number such as "1.3.0" or "1.3" and a timestamp in its name. For example, a snapshot component for "commons-lang 1.3.0" might have the name "commons-lang-1.3.0.-20090314.182342-1.jar". The associated POM, MD5 and SHA hashes would also have a similar name. To facilitate collaboration during the development of software components, Maven and other clients that know how to consume snapshot components from a repository also know how to interrogate the metadata associated with a Snapshot component to retrieve the latest version of a Snapshot dependency from a repository.
While it is possible to create a repository which serves both release and snapshot components, repositories are usually segmented into release or snapshot repositories serving different consumers and maintaining different standards and procedures for deploying components. Much like the difference between networks, a release repository is considered like a production network and a snapshot repository is more like a development or a testing network. While there is a higher level of procedure and ceremony associated with deploying to a release repository, snapshot components can be deployed and changed frequently without regard for stability and repeatability concerns.
A project under active development produces snapshot components that change over time. A release is comprised of components which will remain unchanged over time.
Version policy
Every repository has one of the 3 version policies configured:
- Release A Maven repository can be configured to be suitable for release components with the Release version policy. The Central Repository uses a release version policy.
- Snapshot Continuous development is typically performed with snapshot versions supported by the Snapshot version policy. These version values have to end with -SNAPSHOT in the POM file. This allows repeated uploads where the actual number used is composed of a date/timestamp and an enumerator and the retrieval can still use the -SNAPSHOT version string. The repository manager and client tools manage the metadata files that manage this translation from the snapshot version to the timestamp value.
- Mixed The Mixed version policy allows us to support both approaches within one repository.
Hosting Maven Repositories
A hosted Maven repository can be used to deploy our own as well as third-party components. A default installation of Nexus Repository Manager includes two hosted Maven repositories. The maven-releases repository uses a release version policy and the maven-snapshots repository uses a snapshot version policy.
Deploying to Hosted Maven repository
Deployment to a repository is configured in 2 steps
Configuring Repository in Maven Project
Deployment to a repository is configured in the pom.xml for the respective project in the "distributionManagement"
section:
<project>
   ...

    <distributionManagement>
        <repository>
            <id>nexus</id>
            <name>Releases</name>
            <url>https://nexus-host/repository/maven-releases</url>
        </repository>
        <snapshotRepository> <!-- This repository can be omitted -->
            <id>nexus</id>
            <name>Snapshot</name>
            <url>https://nexus-host/repository/maven-snapshots</url>
        </snapshotRepository>
    </distributionManagement>

   ...
-
Replace the
nexus-hostwith the NDS address pointing to the actual Nexus instance andmaven-releases/maven-snapshotsto the actual repository name. For example,<distributionManagement>
<repository>
<id>nexus</id>
<name>Releases</name>
<url>https://nexus.paion-data.dev/repository/maven-oss</url>
</repository>
</distributionManagement> -
The "Snapshot" repository (tagged
snapshotRepositoryabove) can be omitted in the most CI/CD-enabled project team
Obtaining Push Access to Repository
The credentials used for the deployment are configured in the "server" section of the settings.xml file. In the
example below server contains "nexus" as the id, along with a "headless user's" username and password. They are the
credentials needed to authenticate against the repository:
<settings>
...

    <servers>
        <server>
            <id>nexus</id>
            <username>some-headless-username</username>
            <password>some-headless-password</password>
        </server>
    </servers>

...
Next, we need to grant the user above (i.e. "some-headless-username") the push access on the repository side in the following steps:
- Create a content selector
- Create a privilege
- Create a role
- Assign role to the headless user defined above
A full build of project, including downloading the declared dependencies and uploading the build output to the
repository manager, can now be invoked with mvn clean deploy.
Deploying to Hosted Maven Repository via CI/CD (e.g. GitHub Actions)
Note that we deployed in the last minute our artifact to repository through a manual mvn clean deploy command. To
enable automatic deployment to the repository, we will simply go through
the exact same procedure except that instead of running
mvn clean deploy locally and manually, we let CI/CD execute that for us.
Up-version Automatically
It should be noted that a standard release repository does not allow an artifacts with a defined version to be pushed into it twice. For example, if our artifacts is my-artifact-1.1.2.jar, this JAR, with version 1.1.2, will fail to be published onto the repository the 2nd time unless we delete the version 1.1.2 up there.
Therefore, we need to bump the artifact version each time we release. We achieve this using GitHub's tagging system. The two scripts below, taken from Yahoo/fili's CI/CD, creates a new tag based on previous release tag:
-
tag-for-release.bash
#!/bin/bash

# Pick up the tags from the adjusted remote
git fetch --unshallow
git fetch --tags

echo $(git branch -v)

# Get the last tag on this branch
LAST_TAG=$(git describe)
echo "INFO Last tag: $LAST_TAG"

# Build the new tag to push
NEW_TAG=$(LAST_TAG=${LAST_TAG} python .github/upversion.py)
echo "INFO Creating tag: $NEW_TAG"
git tag $NEW_TAG -a -m "Autogenerated version bump tag"

# Push the new tag
echo "INFO Pushing tag: $NEW_TAG"
git push origin $NEW_TAG -
upversion.py
#!/usr/bin/python

import os

split_tag = (os.environ['LAST_TAG'].split('-')[0]).split(".")
split_tag[-1] = str(int(split_tag[-1]) + 1)
print(".".join(split_tag))
We put these two files under .github directory.
Deploying to GitHub Packages
Create a release.yml file under .github/workflows directory with the following content:
---
name: Release

on:
  push:
    branches:
      - master

jobs:
  test:
    uses: ./.github/workflows/test.yml
    secrets: inherit

  publish:
    needs: [test]
    runs-on: ubuntu-latest
    permissions:
      contents: write # allow for pushing tag
      packages: write
    steps:
      - uses: actions/checkout@v3
      - uses: actions/setup-java@v3
        with:
          java-version: '11'
          distribution: 'adopt'
      - name: Tag for release
        run: |
          git config --global user.name 'QubitPi'
          git config --global user.email 'jack20191124@proton.me'
          .github/tag-for-release.bash
      - name: Set release version
        run: |
          VERSION=$(git describe)
          mvn versions:set -DnewVersion=$VERSION -DgenerateBackupPoms=false
          mvn versions:update-property -Dproperty=version.owner -DnewVersion=$VERSION -DgenerateBackupPoms=false
      - name: Publish Package to Paion Nexus Repository
        run: mvn --batch-mode deploy
        env:
          GITHUB_TOKEN: ${{ secrets.GITHUB_TOKEN }}
      - name: Deploy documentation to GitHub Pages
        uses: peaceiris/actions-gh-pages@v3
        with:
          github_token: ${{ secrets.GITHUB_TOKEN }}
          publish_dir: ./docs
          enable_jekyll: true
          user_name: QubitPi
          user_email: jack20191124@proton.me
The test job defined above is a workflow call that delegates all testing to a separate
GitHub Action. An example of such workflow could be:
---
name: Test

on:
  workflow_call:
  pull_request:
    types: [opened, synchronize, reopened]

jobs:
  test:
    name: Test
    runs-on: ubuntu-latest
    steps:
      - uses: actions/checkout@v2
      - name: Set up JDK 11 for Build
        uses: actions/setup-java@v1
        with:
          java-version: 11
      - name: Build
        run: mvn -B clean verify
The "Set release version" step above was inspired by yahoo/fili's approach
Deploying to Nexus 3
Or we can deploy to any hosted repository such as Nexus 3 with a slightly modified release definition:
Note that this file differs from the GitHub version by
replacing the GITHUB_TOKEN with the dedicated credentials put in a dynamically generated settints.xml file using
the whelk-io/maven-settings-xml-action action. These
credentials are sealed securely in GitHub Secrets. We need to define the following 3 secrets:
- MAVEN_DEPLOY_SERVER_ID
- MAVEN_DEPLOY_SERVER_USERNAME
- MAVEN_DEPLOY_SERVER_PASSWD
---
name: Release

on:
  push:
    branches:
      - master

jobs:
  test:
    uses: ./.github/workflows/test.yml
    secrets: inherit

  publish:
    needs: [test]
    runs-on: ubuntu-latest
    permissions:
      contents: write # allow for pushing tag
      packages: write
    steps:
      - uses: actions/checkout@v3
      - uses: actions/setup-java@v3
        with:
          java-version: '11'
          distribution: 'adopt'
      - name: Tag for release
        run: |
          git config --global user.name 'QubitPi'
          git config --global user.email 'jack20191124@proton.me'
          .github/tag-for-release.bash
      - name: Set release version
        run: |
          VERSION=$(git describe)
          mvn versions:set -DnewVersion=$VERSION -DgenerateBackupPoms=false
          mvn versions:update-property -Dproperty=version.owner -DnewVersion=$VERSION -DgenerateBackupPoms=false
      - name: Generate settings.xml in order to grant push access to Paion Nexus Repository
        uses: whelk-io/maven-settings-xml-action@v20
        with:
          servers: >
            [
              {
                "id": "${{ secrets.MAVEN_DEPLOY_SERVER_ID }}",
                "username": "${{ secrets.MAVEN_DEPLOY_SERVER_USERNAME }}",
                "password": "${{ secrets.MAVEN_DEPLOY_SERVER_PASSWD }}"
              }
            ]
      - name: Publish Package to Paion Nexus Repository
        run: mvn --batch-mode deploy
      - name: Deploy documentation to GitHub Pages
        uses: peaceiris/actions-gh-pages@v3
        with:
          github_token: ${{ secrets.GITHUB_TOKEN }}
          publish_dir: ./docs
          enable_jekyll: true
          user_name: QubitPi
          user_email: jack20191124@proton.me
We can later pull our released artifact from the hosted repository by placing the repository section. For example:
<project>

    ...

    <repositories>
        <repository>
            <id>paion</id>
            <name>Paion Data Official Release Repository</name>
            <url>https://nexus.paion-data.dev/repository/maven-oss</url>
        </repository>
    </repositories>
</project>
Using Repository Manager with Apache Maven
To use repository manager with Apache Maven, configure Maven to check the repository manager instead of the default, built-in connection to the Central Repository.
To do this, we add a mirror configuration and override the default configuration for the central repository in our "~/.m2/settings.xml", shown below:
Replace the "nexus-host" with the NDS address pointing to the actual Nexus instance.
<settings>
  <mirrors>
    <mirror>
      <!--This sends everything else to /public -->
      <id>nexus</id>
      <mirrorOf>*</mirrorOf>
      <url>https://nexus-host/repository/maven-public/</url>
    </mirror>
  </mirrors>

  <profiles>
    <profile>
      <id>nexus</id>
      <!--Enable snapshots for the built in central repo to direct -->
      <!--all requests to nexus via the mirror -->
      <repositories>
        <repository>
          <id>central</id>
          <url>http://central</url>
          <releases><enabled>true</enabled></releases>
          <snapshots><enabled>true</enabled></snapshots>
        </repository>
      </repositories>
     <pluginRepositories>
        <pluginRepository>
          <id>central</id>
          <url>http://central</url>
          <releases><enabled>true</enabled></releases>
          <snapshots><enabled>true</enabled></snapshots>
        </pluginRepository>
      </pluginRepositories>
    </profile>
  </profiles>

  <activeProfiles>
    <!--make the profile active all the time -->
    <activeProfile>nexus</activeProfile>
  </activeProfiles>
</settings>
In the configuration above, a single profile called nexus is defined. It configures a repository and a pluginRepository with the id central that overrides the same repositories in the Super POM. The Super POM is internal to every Apache Maven install and establishes default values. These overrides are important since they change the repositories by enabling snapshots and replacing the URL with a bogus URL. This URL is overridden by the mirror setting in the same settings.xml file to point to the URL of our single repository group. This repository group can, therefore, contain release as well as snapshot components and Maven will pick them up.
In addition, The mirrorOf pattern of * causes any repository request to be redirected to this mirror and to our
single repository group, which in the example is the public group.
It is possible to use other patterns in the "mirrorOf" field. A possible valuable setting is to use external:*. This matches all repositories except those using "localhost" or file based repositories. This is used in conjunction with a repository manager when you want to exclude redirecting repositories that are defined for integration testing. The integration test runs for Apache Maven itself require this setting.
More documentation about mirror settings can be found in the mini guide on the Maven web site.
For startup who doesn't really need to proxy the entire Maven Central at the moment, another approach is to set up multiple repositories. In each project they are working on, they will still fetch everything from Maven Central except for their hosted component from Nexus
There are two different ways that we can specify the use of multiple repositories. The first way is to specify in a POM which repositories we want to use. That is supported both inside and outside of build profiles:
<project>
    ...

    <repositories>
        <repository>
            <id>my-repo1</id>
            <name>your custom repo</name>
            <url>http://jarsm2.dyndns.dk</url>
        </repository>
        <repository>
            <id>my-repo2</id>
            <name>your custom repo</name>
            <url>http://jarsm2.dyndns.dk</url>
        </repository>
    </repositories>

    ...
</project>
The other way we can specify multiple repositories is by creating a profile in the ${user.home}/.m2/settings.xml or
${maven.home}/conf/settings.xml file like the following:
<settings>
    ...
    <profiles>
        ...
        <profile>
            <id>myprofile</id>
            <repositories>
                <repository>
                    <id>my-repo2</id>
                    <name>your custom repo</name>
                    <url>http://jarsm2.dyndns.dk</url>
                </repository>
            </repositories>
        </profile>
        ...
    </profiles>

     <activeProfiles>
         <activeProfile>myprofile</activeProfile>
     </activeProfiles>
     ...
</settings>
If we specify repositories in profiles we must remember to activate that particular profile. As we can see above we do
this by registering a profile to be active in the activeProfiles element.
We could also activate this profile on the command like by executing the following command:
mvn -Pmyprofile ...
In fact the -P option will take a CSV list of profiles to activate if we wish to activate multiple profiles
simultaneously.
The settings descriptor documentation can be found on the Maven Local Settings Model Website.
Remote repository URLs are queried in the following order for artifacts until one returns a valid result:
- Global settings.xml
- User settings.xml
- Local pom.xml
- Parent POMs, recursively
- Super POM
- effective POMs from dependency path to the artifact.
For each of these locations, the repositories within the profiles are queried first in the order outlined at Introduction to build profiles.
Before downloading from a repository, mirrors configuration is applied.
Effective settings and local build POM, with profile taken into account, can easily be reviewed to see their
repositories order with mvn help:effective-settings and mvn help:effective-pom -Dverbose.
Setting Up Docker Registry
Docker containers and their usage have revolutionized the way applications and the underlying operating system are packaged and deployed to development, testing and production systems. The creation of the Open Container Initiative, and the involvement of a large number of stakeholders, guarantees that the ecosystem of tools around the lightweight containers and their usage will continue to flourish. Docker Hub is the original registry for Docker container images and it is being joined by more and more other publicly available registries such as the Google Container Registry and others.
Nexus Repository Manager OSS support Docker registries as the Docker repository format for hosted and proxy repositories. We can expose these repositories to the client-side tools directly or as a repository group, which is a repository that merges and exposes the contents of multiple repositories in one convenient URL. This allows us to reduce time and bandwidth usage for accessing Docker images in a registry as well as share our images within our organization in a hosted repository. Users can then launch containers based on those images, resulting in a completely private Docker registry with all the features available in the repository manager.
Docker Port Scalability
The Docker client has strict requirements about how it can retrieve content from a repository (i.e., a registry). These requirements mainly center around the path at which it expects everything to be hosted.
While it is possible to tell the Docker client to use a chosen host from which to retrieve (or to which to upload) images, it is not possible to tell it to use an arbitrary base path where images are stored in a registry.
To further explain, the Docker client is given a registry to contact by specifying only the hostname + port. It's also
given a specific path to an image in that registry. So, for example, it would be given
example:443/some/custom/image to specify an image. We are not able to specify a registry application path.
Nexus Repository exposes its Docker registries with a repository path of /repository/<repo_name>/ and, by default,
and application context path of /.
So, a full Docker image in the repository "docker-hosted" might be accessible at full URL "example:443/nexus3/repository/docker-hosted/some/custom/image", which can be broken down as follows:
- example.com = host name
- 443 = port
- /nexus3 = application context path
- /repository/docker-hosted = base registry path
- /some/custom/image = specific image path in the registry
There is no way to give the Docker client the application context path or base registry path. Docker needs the registry exposed at the root of the host + port that it is accessing.
This is important because Nexus Repository uses request paths to separate content between different repositories. There are a few potential ways to overcome this Docker limitation:
Access Control
Nexus Repository uses role-based access control (RBAC) to give administrators fine-grained control over user rights to the following:
- Access to the Nexus Repository web application
- Read access to a component path in a repository
- Administator access to configuration
- Publish or upload files to a repository
The default configuration ships with the administrator role and optional anonymous access to browse and read all repositories. We should not use the default anonymous role if we need to create protected repositories.
Realms
A realm is a security policy domain defined for a web or application server. The protected resources on a server can be partitioned into a set of protection spaces, each with its own authentication scheme and/or authorization database containing a collection of users and groups.
The realms can be accessed via the Realms menu item located under Security, in the Administration main menu.
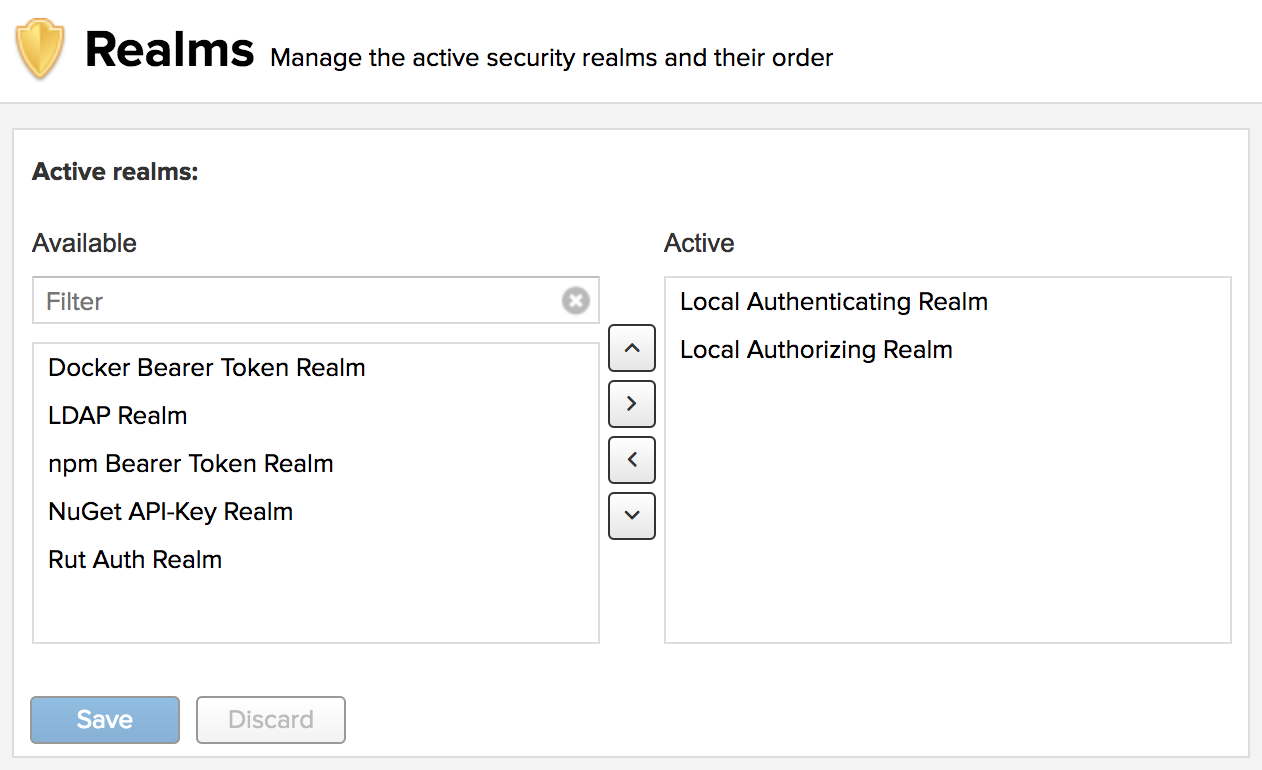
Effectively, the configuration shown above determines what authentication realm is used to grant a user access and the order the realms are used.
- Local Authenticating Realm and Local Authorizing Realm These are the built-in realms used by default. They allow the repository manager to manage security setup without additional external systems. Sonatype recommends keeping the Local realms at the top of the active list. In the event of system recovery, if we have them lower in the order (or removed), restoration may be more difficult.
Privileges
Privileges define actions which can be performed against specific functionality. Privileges can only be assigned to roles.
To access Privileges go to Security in the Administration menu, where it's listed as a sub-section. An extensive list of privileges is already built in the repository manager and is partially shown in the figure below
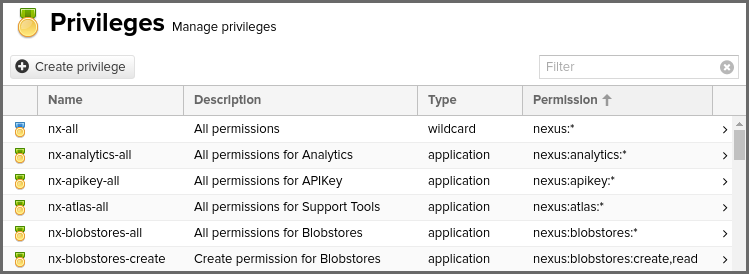
This feature allows us to inspect existing privileges and create custom privileges as required. Users will need nx-privilege or nx-all privileges to access this page.
Privilege Names
Names are unique identifiers. Privileges included by default are prefixed with nx- . Privileges that are migrated
from Nexus Repository 2 will be named as they were in Repository 2. Privileges that we create ourselves can only
consist of letters, digits, underscores(_), hyphens(-), and dots(.). A privilege name cannot start with an
underscore or dot.
For custom privileges, it is encouraged that we use a simple convention to namespace our privileges. For example using a simple acronym representing our organization name. "Example Organization Inc." could prefix its privilege names with eoi- for example.
Privilege Types
The privilege list displays an icon for the privilege Type as the first column in the list:
Privilege permissions are represented by a colon separated list of text segments, where each segment can be one of:
- a single text value
- a comma separated list of text values
- an asterisk character * to represent all values in that segment
The internal segment matching algorithm uses Apache Shiro wildcard permissions.
-
application (
nexus:{name}:{actions})- Applicable Actions: create, read, update, delete
- Description: Application type privileges are most commonly the built-in privileges that control access to specific product feature areas in the Administration UI. For example, "nexus:blobstores:create,read" means allowing for creating and reading blobstores
-
repository-admin (
nexus:repository-admin:{format}:{repository}:{actions})- Applicable Actions: browse,read,edit,add,delete
- Description: Repository Admin privileges control administration of configuration for specific repositories or repository formats. For example, "nexus:repository-admin:nuget:nuget.org-proxy:browse,read" means allowing viewing of the repository configuration for the nuget format repository named "nuget.org-proxy". These privileges do not control access to repository content.
-
repository-content-selector (
nexus:repository-content-selector:{selector}:{format}:{repository}:{actions})- Applicable Actions: browse,read,edit,add,delete
- Description: Repository Content Selector privileges provide fine-grained control over access to content within a repository by way of a content selector. For example, "nexus:repository-content-selector::maven2::read" means allowing a user for read access to any content matching a content selector defined for the maven2 format.
-
repository-view (
nexus:repository-view:{format}:{repository}:{actions})- Applicable Actions: browse,read,edit,add,delete
- Description: Repository View privileges control general access to all content contained within specific repositories or repository formats. For example, "nexus:repository-view:maven2:central:browse,read" means allow browsing and viewing content within the maven2 format repository named central. These privileges do not allow changing configuration of a repository.
-
script (
nexus:script:{script name}:{actions})- Applicable Actions: browse,read,edit,add,delete,run
- Description: Script privileges control access to using the Groovy Script related REST APIs as documented in REST and Integration API . These privileges do not control general REST API access. For example, "nexus:script:*:read" means allowing for read access to all scripts of any name. "nexus:script:my-uploaded-script:run" means allowing the calling user for running (executing) the script named my-uploaded-script
-
wildcard (
*)- Applicable Actions: *
- Description: Wildcard privileges allow one to build a privilege string using a free-form series of segments. All other privilege types are more specific segment forms of a wildcard privilege. There is only one wildcard privilege included by default named nx-all with permission nexus:* that gives access to all functionality.
Actions are functions allowing an explicit behavior the privilege can perform with the associated function.
The Actions to choose from are
- add allows privileges to add repositories or scripts.
- read allows privileges to view various configuration lists and scripts. Without read, any associated action will permit a privilege to see these lists but not its contents. The read action also allows privileges to utilize tools that can look at content from the command line.
- browse allows privileges to view the contents of associated repositories. Unlike read, privilege types with browse can only view and administrate repository contents from UI.
- create allows privileges to create applicable configurations within the repository manager. Since a read permission is required to view a configuration, this action is associated with most existing create privileges.
- delete allows privileges to delete repository manager configurations, repository contents, and scripts. A read action is generally associated with delete actions, so the actor can view these configurations to remove them.
- edit allows privileges to modify associated scripts, repository content, and repository administration.
- update allows privileges to update repository manager configurations. Most existing privileges with update include read actions. Therefore, if creating custom privileges with update, the actor should consider adding read to the privilege in order to view repository manager configuration updates.
*, the wildcard, gives us the ability to group all actions together.
We must assign a single or combination of comma-delimited actions when creating new privileges. The privilege type to which we apply any of these Actions will perform the action's implied behavior. Consider how each action behaves when applied to a privilege type
Creating a Privilege
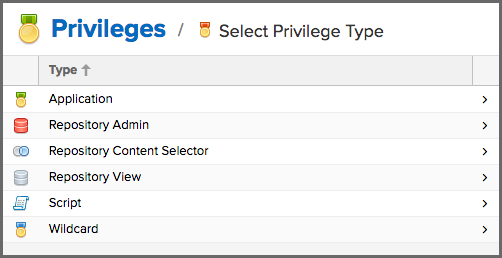
Click the Create privilege button to view a list of privilege types
After selecting a type, fill in the required fields and save the privilege. The privilege can be found listed among the default privileges on the main Privileges screen. We can use the Filter input box to find a specific privilege. In the following example, an Application privilege type is created:
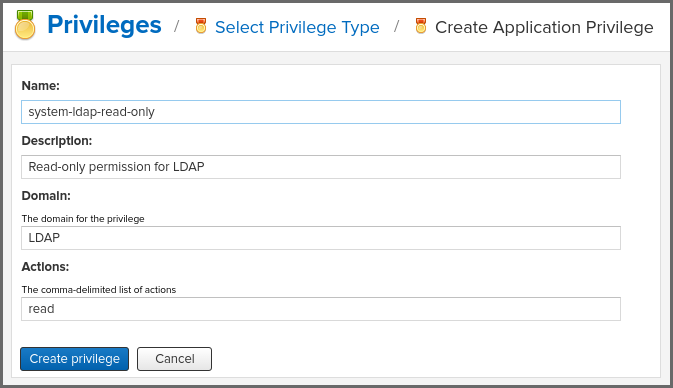
The form provides Name, Description, Domain, and Actions in figure above. The form is completed for a privilege that allows read access to the LDAP administration. If assigned this privilege, a user is able to view LDAP administration configuration but not edit it, create a new LDAP configuration, nor delete any existing LDAP configurations.
In another example, a Repository View privilege type is created:
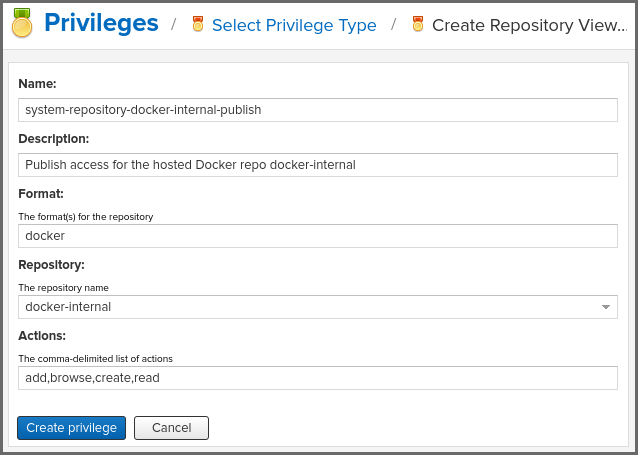
The form provides Name, Description, Format, Repository, and Actions in figure above. The form is completed for a privilege granting sufficient access to publish images to a specific hosted repository. A user with this privilege can view and read the contents of the repository as well as publish new images to it, but not delete images.
Content Selectors
Content selectors provide a means for us to select specific content from all of our content. The content we select is evaluated against expressions written in CSEL (Content Selector Expression Language). CSEL is a light version of JEXL used to script queries along specific paths and coordinates available to our repository manager formats.
Content selectors allow us to define what content users are allowed to access. We can define, in a simplified example,
a selector named "Apache Maven" with a search expression of path =~ "^/org/apache/maven/". This would match all
components that start with the designated component path. Another, yet more complete, example would be to "select all
maven2 content along a path that starts with org.apache.commons":
format == "maven2" and path =~ "^/org/apache/commons/.*"
Creating a Query
Before we identify user permissions for our selector, create the query first. Click Content Selectors located in Repository, from the Administration menu. Click Create Selector to open a new form.
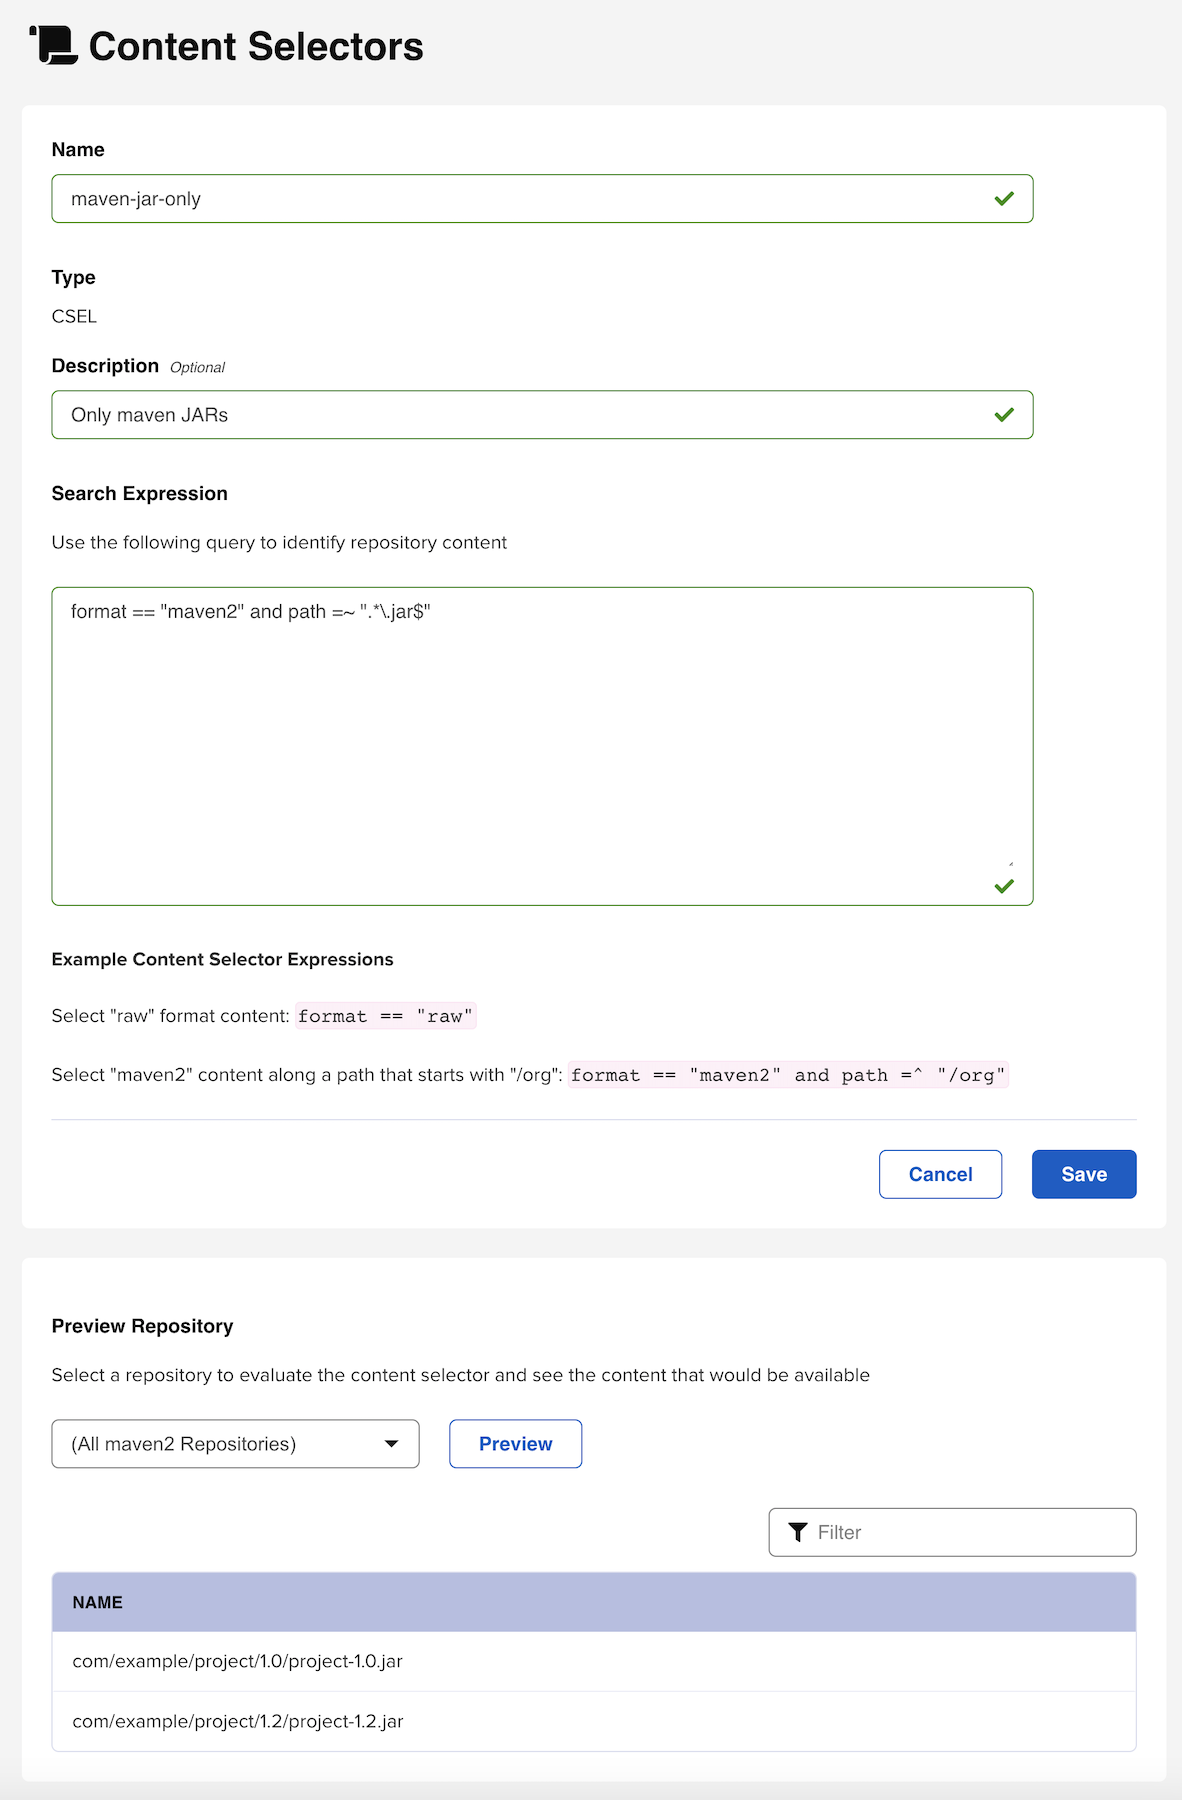
We can preview our selector and what results it will return by clicking the Preview results button located somewhere in the middle section of the page. Select a repository or grouping of repositories from the Preview Repository dropdown and click the Preview button. Assets that match will be returned in the space below the filter and can be filtered upon if we wish to check on a specific result.
Once we are satisfied with our fields, click Save to create the content selector. All saved selector queries we create will be listed in the Content Selectors screen.
Finer Access Control with "Content Selector privilege"
As part of our security setup, we can create user permissions to manage the filters we built in the Create Selector form. We can add a new privilege that controls operations of read, edit, delete or * (all) for components matching that selector. The privilege can even span multiple repositories.
To create a new content selector privilege, click Privileges in the Security section of the Administration panel. Then click the Create privilege button. Locate and click Repository Content Selector from the list of options in Select Privilege Type. We will see a form that displays the following:
- Name: Create a name for the content selector privilege.
- Description: Add a brief description for the privilege.
- Content Selector: Use this dropdown to select from a list of selectors we created.
- Repository: Use this dropdown to select from either a range of all repository contents, all repository contents of an individual format, or repositories created by us.
- Actions: Grant read, edit, delete, or * (all) privileges for user access control.
To complete the form, save the new privilege by clicking Create privilege. We can use our new privilege to regulate what permissible data we want the user to access. We could group all related privileges into a role. Ultimately, we could assign our roles to a user.
Content Selector Query Reference
Below are the allowable attributes for content selectors that define path and format as values supported by Nexus Repository Manager.
| Attribute | Allowed Values |
|---|---|
| format | The format of the content for which we query |
| path | The path of our repository content |
Valid Operators are
| Operator | Definition | Example |
|---|---|---|
== | Matches text exactly | format == "maven2" |
=~ | Matches a Java regular expression pattern | path =~ "^/org/apache/commons/.*" |
=^ | Starts with text. | path =^ "/com/example/" |
and | Match all expressions | format == "maven2" and path =~ "^/org/apache/commons/.*" |
or | Match any expression | format == "maven2" or format == "npm" |
( expr ) | Group multiple expressions. | 1 |
To avoid encountering database errors, we should escape dashes in version range regular expressions. For example,
path =~ "[0-9a-zA-Z\-_]"
When writing a content selector, remember that the asset's path will always begin with a leading slash when the selector is evaluated. This is true even though the leading slash is not displayed when searching or browsing assets.
Roles
Roles aggregate privileges into a related context and can, in turn, be grouped to create more complex roles.
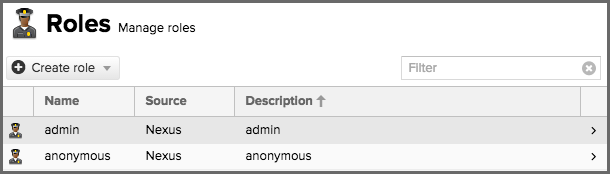
The repository manager ships with a predefined admin as well as an anonymous role. These can be inspected in the Roles feature view accessible via the Roles item in the Security section of the Administration main menu. A simple example is shown in figure below. The list displays the Name and Description of the role as well as the Source, which displays whether the role is internal (Nexus) or a mapping to an external source like LDAP. In order to access these functions, a user must have nx-roles or nx-all privileges.
To create a new role, click on the Create Role button, select Nexus role and fill out the Role creation feature view:
To use functions of creating, editing and deleting roles, a user without the nx-all privilege also will need nx-privilege-read. This is because the roles page lists privileges on it.
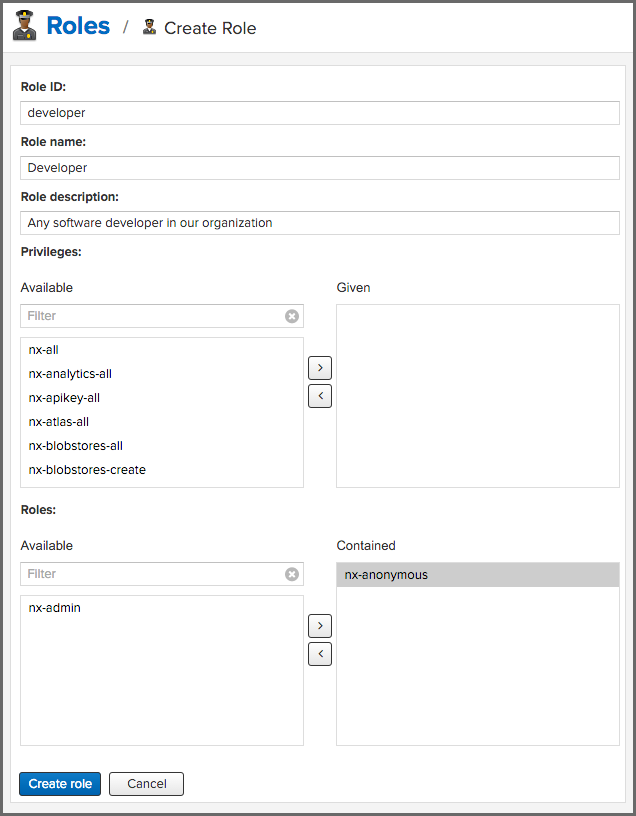
When creating a new role, we will need to supply a Role ID and a Role Name and optionally a Description. Roles are comprised of other roles and individual privileges. To assign a role or privilege to a role, drag and drop the desired privileges from the Available list to the Given list under the Privileges header. We can use the Filter input to narrow down the list of displayed privileges and the arrow buttons to add or remove privileges.
The same functionality is available under the Roles header to select among the Available roles and add them to the list of Contained roles.
Finally press the Save button to get the role created.
An existing role can be inspected and edited by clicking on the row in the list. This role-specific view allows us to delete the role with the Delete button. The built-in roles are managed by the repository manager and cannot be edited or deleted.
Mapping External Groups to Nexus Roles
In addition to creating an internal role, the Create Role button allows us to create an External Role Mapping to an external authorization system configured in the repository manager such as LDAP. This is something we would do, if we want to grant every member of an externally managed group (such as an LDAP group) a number of privileges and roles in the repository manager
For example, assume that we have a group in LDAP named "scm" and we want to make sure that everyone in that group has administrative privileges.
Select External Role Mapping and LDAP to see a list of roles managed by that external realm in a dialog. Pick the desired scm group and confirm by pressing Create mapping.
For faster access or if we cannot see our group name, we can also type in a portion or the whole name of the group and it will limit the dropdown to the selected text.
Once the external role has been selected, creates a linked role. We can then assign other roles and privileges to this new externally mapped role like we would do for any other role.
Any user that is part of the scm group in LDAP, receives all the privileges defined in the created role allowing us to adapt our generic role in LDAP to the repository manager-specific use cases we want these users to be allowed to perform.
Users
The repository manager ships with two users by default: admin and anonymous. The admin user has all privileges
and the anonymous user has read-only privileges. The initial password for the admin user can be found in an
"admin.password" file found in the $data-dir directory after starting the server.
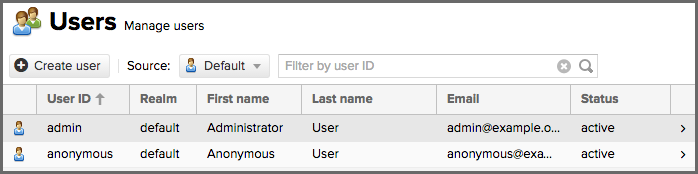
The Users feature view displayed in figure below can be accessed via the Users item in the Security section of the Administration menu. Users must have nx-users or nx-all privileges to see this page. On page load, the security Source of "Local" is selected and represents the local NXRM realm. The filtered list shows the users' User ID, First Name, Last Name, Email and Status from the security Source selected in the dropdown.
Clicking on a user in the list or clicking on the Create local user button displays the details view to edit or create the account shown in figure below. For external users, such as LDAP or Crowd, once we have our external realm setup we can edit their permissions here as well. Simply select the realm the user is on from the Source dropdown. Then type the user ID into the field to the right of that dropdown and search for it. Then click on the result desired to edit, same as a local user.
To use functions of creating, editing and deleting users, a user without the nx-all privilege also will need nx-roles-read. This is because the users page lists roles on it.
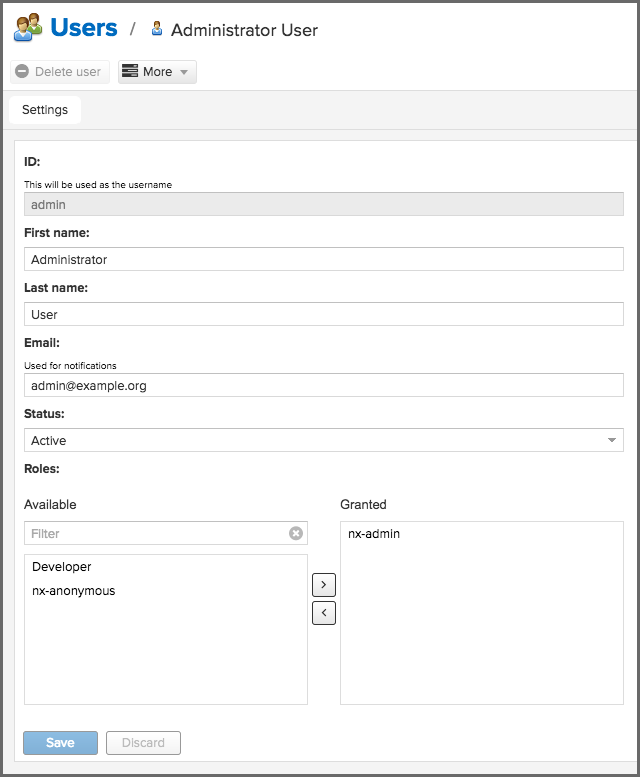
The ID can be defined upon initial creation and remains fixed thereafter. In addition we can specify the users First Name, Last Name and Email address. We also must enter and confirm a Password.
The Status allows us to set an account to be Disabled or Active. The Roles control allows us to add and remove defined roles to the user and therefore control the privileges assigned to the user. A user can be assigned one or more roles that in turn can include references to other roles or to individual privileges.
On edit, we can select Change Password item in the drop down. The password can be changed in a dialog, provided the user is managed by the built-in security realm.
Default Role
The Default Role is a role that is automatically granted to all authenticated users.
To enable appending a default role to all authenticated users, navigate to the Capabilities item in the System section of the Administration menu; then hit Create capability and choose capability type Default Role as pictured below; we will then be able to select the role that we want applied to users.
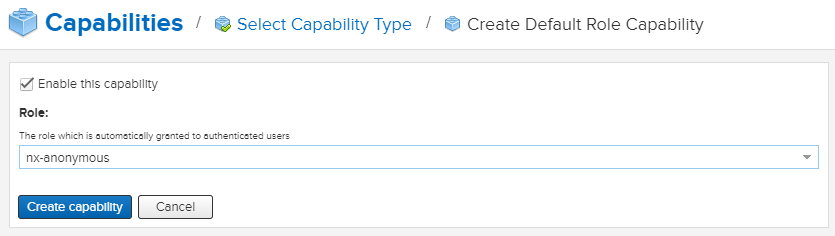
Once this is saved, the Default Role Realm will be added to the active list of security realms and start applying the new role to all authenticated users.
This default role is appended to authenticated users dynamically, and will NOT show up as assigned to any user via the User administration page.
Troubleshooting
"413 Request Entity Too Large"
If deploying, for example, a Maven JAR or Docker image to some Nexus repository results in "413 Request Entity Too Large" error, that's due to, in the case of Nginx as reverse proxy in front of the Nexus, our server block having a default value for client_max_body_size of around 1MB in size when unset.
To resolve this, we will need to add the following line to our server block (/etc/nginx/nginx.conf):
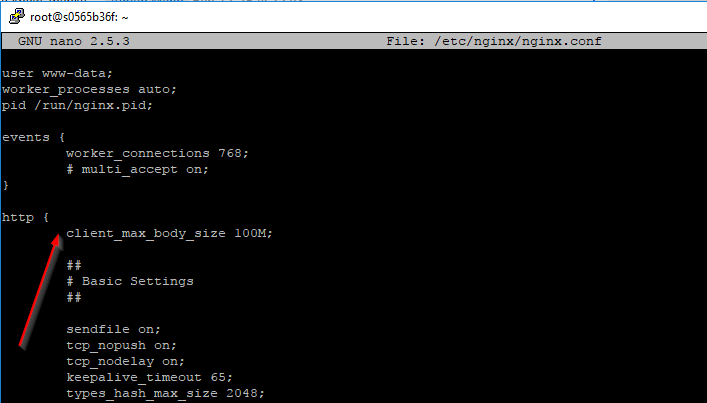
For more information, such as where "client_max_body_size" directive should be placed, please refer to Nginx documentation
"400 Repository does not allow updating assets"
The version already exists on a release repository. We will need to either bump component version or let Nexus admin to delete the root folder of that component.
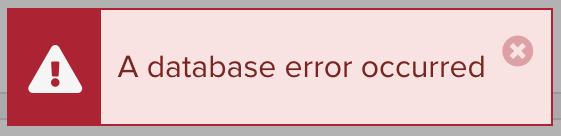
"A database error occurred"
When we perform some disk I/O related task on UI and we see the following on the top right corner of the page:
The error itself does not indicate any information about the nature of the error. We will then need to know more details about the error by going down to the Nexus server log.
In case Nexus is running as a Docker container, we need to jump into the container first by executing
docker exec -it <nexus-container-name> bash
where nexus-container-name can be seen using docker ps -a
The log file we will be looking at, in the case of running inside Docker container, is located at
/nexus-data/log/nexus.log
Footnotes
-
format == "npm" or (format == "maven2" and path =~ "^/org/apache/commons/.*")↩